


Novocuff Cervical Control System™
Quick Reference Guide

NOVOCUFF CCS


DEVICE PREPARATION
Always use sterile technique when handling the Novocuff CCS.
1. REMOVE AIR
Using a 10 mL or similar sterile luer-tapered syringe, remove the air from the Cervical Cuff Balloon and Positioning Balloon using the Green and Blue Valves.
2. FILL BALLOONS
-
Fill the Cervical Cuff Balloon via the Green Valve with 4 mL of sterile saline.
-
Fill the Positioning Balloon via the Blue Valve with 3 mL of sterile saline.
3. REMOVE ALL REMAINING AIR AND FLUID
While holding the Valve Housing with the Main Body freely suspended, use a syringe to remove all remaining air and sterile saline from both balloons.


DEVICE PLACEMENT
4. PREPARE FOR PLACEMENT
Before placement, prepare the vagina with chlorhexidine or povidone-iodine solution (e.g., Betadine). Note: Sterile saline or water may be used to wet the device prior to placement; DO NOT USE LUBRICANT.
5. PLACE NOVOCUFF
-
Place the Novocuff CCS digitally by folding the Main Body in half before inserting it into the vagina. When inserted, the Cervical Cuff Balloon (smaller opening of the Main Body) is oriented toward the uterus, and the Positioning Balloon is oriented posteriorly. If needed, cervical visualization can be performed with sterile OB/GYN instruments. Note: DO NOT USE A TENACULUM FOR DEVICE PLACEMENT.
-
Confirm the Novocuff CCS is positioned around the highest possible part of the cervix, against the fornix, with the Bi- lumen Tubing extended down so that the Valve Housing is outside of the introitus.
6. FILL BALLOONS
-
Fill the Cervical Cuff Balloon with 4 mL of sterile saline via the Green Valve. If significant resistance is felt prior to this amount, less saline may be used.
-
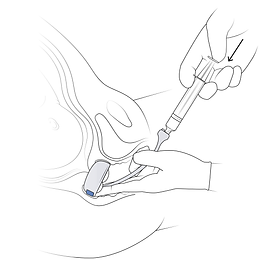
Fill the Positioning Balloon with 3 mL sterile saline via the Blue Valve. If significant resistance is felt prior to this amount, less saline may be used.
7. PLACE VALVE HOUSING
After closing the cap, ensure the Valve Housing and the Bi-lumen Tubing are placed inside the vaginal canal, away from the introitus, so that no part of the Novocuff CCS remains outside of the vagina.


DEVICE REMOVAL
Remove the Novocuff CCS when either of the following occur: indication for delivery or onset of labor
8.EMPTY BALLOONS
-
Using a sterile luer-tapered syringe, remove the saline from the Positioning Balloon using the Blue Valve.
-
Using a sterile luer-tapered syringe, remove the saline from the Cervical Cuff Balloon using the Green Valve.
9. REMOVE NOVOCUFF
Hook the device digitally to disengage it from the cervix and remove it. The Main Body may be folded to facilitate ease of removal. Note: Do not pull on Bi-lumen Tubing to remove.


TROUBLESHOOTING
Evident amniotic fluid leakage or patient complaint necessitating fluid adjustment: Gently remove the Bi-lumen Tubing and the Valve Housing from the vagina to add or remove sterile saline using a sterile luer-tapered syringe. After closing the cap, place the Bi-lumen Tubing and Valve Housing back into the vaginal canal. Maximum fill volume should not exceed 5 mL for the Cervical Cuff Balloon and 4 mL for the Positioning Balloon.
Valve Housing and/or Bi-Lumen Tubing extending outside the vagina: If any part of the Valve Housing or Bi-lumen Tubing is found outside the vagina, the user or patient should place it back inside the vaginal canal, away from the introitus, with no component remaining outside of the vaginal canal.

MATERIALS NEEDED BUT NOT SUPPLIED
-
Chlorhexidine or povidone-iodine solution (e.g., Betadine)
-
10 mL sterile luer-tapered syringe or similar
-
Sterile saline
DEVICE ORIENTATION


Correct Orientation
Incorrect Orientation
Small opening toward the uterus
Large opening toward the uterus


CAUTION: Investigational Device. Limited by United States Law to investigational use. Please refer to the Novocuff CCS Instructions for Use (IFU) for complete information. LBL-003-2_D